Why This Guide Exists
You’ve launched. The GTM container is published. GA4 is connected. Now what?
Most teams assume tracking ‘just works’ after launch. In reality, 70–80% of analytics implementations contain at least one tracking error at go-live — a misfiring trigger here, a missing parameter there. Left unchecked, those errors silently corrupt your data for weeks or months.
This guide gives you a step-by-step, phase-by-phase playbook to catch every issue, fix it fast, and keep your tracking reliable over time. No guesswork. No assumptions.
Understanding Issue Severity
Not all tracking problems are equal. Before you dive into validation, understand the four severity levels so you can prioritize your fixes correctly:
| Severity | Example Issues | Action Required | Fix Timeline |
| 🔴 Critical | Conversions not firing | Fix immediately — stop everything | Same day |
| 🟠 High | Wrong parameter values | Fix within 24 hours | Day 1–2 |
| 🟡 Medium | Missing secondary params | Fix within the first week | Week 1 |
| 🟢 Low | Minor formatting issues | Fix in next sprint | Week 2+ |
| 💡 Pro Tip | Always triage issues by severity before fixing. Fixing a low-priority formatting issue before a broken conversion tag is a common — and costly — mistake. |
|
PHASE 0: PRE-VALIDATION PREPARATION
Before Launch | Goal: Have everything ready before you need it |
Rushing into validation without the right tools and documentation is one of the most common reasons teams miss issues. Phase 0 ensures you’re set up for success.
0.1 When to Validate
Trigger validation immediately after:
- The website goes live
- The final GTM container is published
0.2 Access and Tools You’ll Need
Platform Access
- GTM container access (note the published container version number)
- GA4 property access — Admin and Analyst roles required
Tools
- Chrome DevTools (built into Chrome — press F12)
- GTM Preview Mode (activated inside GTM)
- GA Debugger or GTM Debug browser extension
Documentation — Have These Ready
- Measurement plan
- Implementation specification
- Full event list with expected parameter values
| ⚠️ Warning | If you don’t have a measurement plan or event list, stop and create one before validating. Without a documented ‘expected’ state, you have nothing to validate against. |
0.3 Create Your Validation Spreadsheet
Create a spreadsheet before you start. This becomes your single source of truth throughout the entire validation process. Include the following columns:
| Event Name | Parameter Name | Expected Value | Actual Value | Status | Notes |
| page_view | page_location | https://example.com/ | (fill in) | Pass ✓ | |
| purchase | transaction_id | Dynamic string | (fill in) | Fail ✗ | ID missing |
Organize rows by category: pageviews, conversions, engagement events, and ecommerce events. Add a separate section to track funnel event counts.
|
PHASE 1: IMMEDIATE TECHNICAL VALIDATION
Day 0–1 | Goal: Confirm tracking works technically |
Phase 1 is about raw technical verification. Does the code fire? Does GA4 receive it? Are the values correct? This phase is done using real-time tools, not historical data.
Step 1 — Validate Using GA4 DebugView
DebugView is a real-time stream inside GA4 that shows every event as it fires. It’s your primary validation tool.
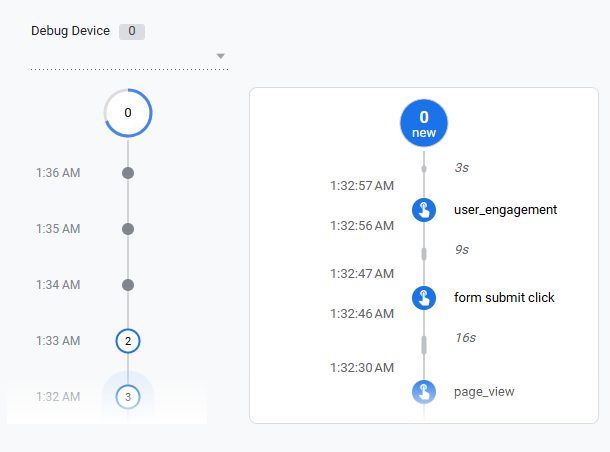
How to Activate DebugView
- Option A: Use GTM Preview Mode — this automatically activates DebugView
- Option B: Install the Google Analytics Debugger browser extension
What to Do
- Activate DebugView using one of the options above
- Open your website in the same browser
- Perform every key user action: page views, button clicks, form submissions, purchases, etc.
- Switch to GA4 and watch DebugView update in real time
What to Check
- Every key event appears in the stream
- Event names exactly match your measurement plan (case-sensitive!)
- Events fire at the right moment — not too early, not too late
- Parameter values are correct and populated (not empty, not ‘undefined’)
| ✅ Pass Criteria | Every event from your measurement plan appears in DebugView with correct names, timing, and parameter values. |
Step 2 — Validate Network Requests in Chrome DevTools
DebugView confirms GA4 sees the events. Chrome DevTools lets you inspect the raw network request and verify the technical data being sent.
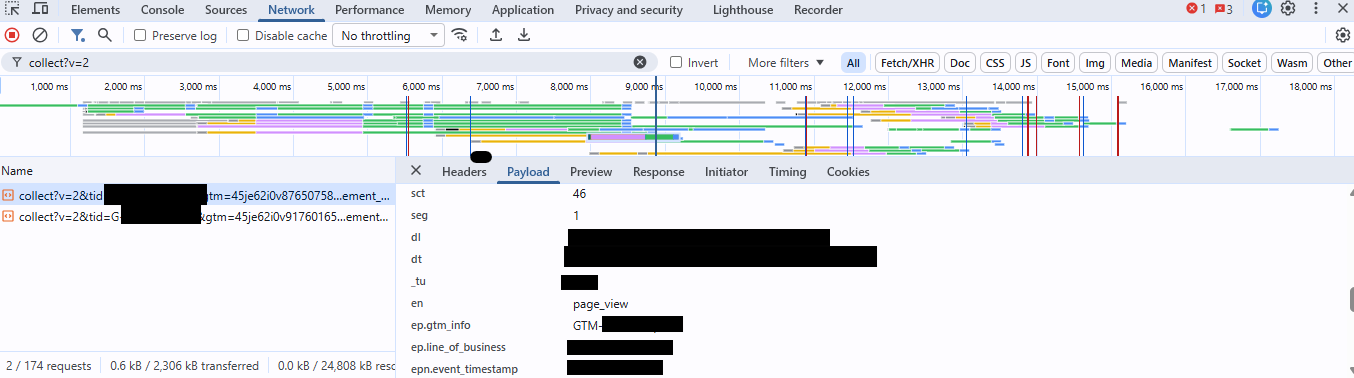
Setup
- Open Chrome DevTools (F12 or right-click → Inspect)
- Go to the Network tab
- Check both ‘Preserve log’ and ‘Disable cache’
- In the filter bar, type: collect?v=2
Parameters to Validate
| Parameter | What to Check | What You Should See |
| Request status | HTTP response code | 204 — means GA4 accepted the request |
| tid | Measurement ID | Matches your GA4 property ID (G-XXXXXXXX) |
| v | Protocol version | Must be v=2 for GA4 |
| en | Event name | Matches the event name in your measurement plan |
| ep.* | Event parameters | Correct values, no ‘undefined’ or empty strings |
| up.* | User properties | Set correctly if using user properties |
| _ss / _s / sid | Session data | Present and populated |
| _et | Engagement time | Non-zero value |
| ✅ Pass Criteria | All network requests return a 204 status, all parameters are present, and all values match expectations. |
Step 3 — Document Your Results
After each test, record results in your validation spreadsheet immediately — don’t rely on memory. Mark each event as Pass, Fail, or Needs Review, and note what was wrong for any that fail.
|
PHASE 2: TROUBLESHOOTING AND FIXES
Day 1–3 | Goal: Resolve all implementation issues |
Step 4 — Identify Discrepancies
Compare your actual values against expected values in the spreadsheet. Group issues by type so you can fix them efficiently:
- Incorrect data types (e.g., number sent as string)
- Missing parameters — event fires but key parameters are empty
- Incorrect formatting (e.g., currency not matching expected format)
- Wrong values — data layer variable pulling from the wrong place
- Unexpected triggers — events firing too early, too late, or multiple times
Step 5 — Fix the GTM Implementation
Work through issues systematically. The most common fix areas in GTM are:
Triggers
- Check timing — is the trigger firing before the data layer is populated?
- Check conditions — are the trigger filters correct?
Variables
- Data layer variables — confirm the variable name matches exactly (case-sensitive)
- JavaScript variables — check for null or undefined return values
Tags
- Event configuration — verify parameter mapping
- User properties — confirm values are passed correctly
| 📋 Best Practice | Document every change you make. Use clear, consistent naming conventions. Use GTM version control — always publish a new version after changes, never overwrite the last published version. |
Step 6 — Re-Validate After Fixes
After any fix, go back to Phase 1 and repeat the full validation cycle:
- Re-run DebugView checks
- Re-check network requests in DevTools
- Update the spreadsheet with new actual values
- Confirm every previously-failed event now passes
| ⚠️ Common Mistake | Teams often fix one issue, check only that event, and call it done. Always re-run the full test suite after any fix — one change can unintentionally break something else. |
|
PHASE 3: DATA COLLECTION VALIDATION
Week 1 | Goal: Confirm business-level data accuracy |
Technical validation confirms events fire. Data collection validation confirms the data makes business sense. You need at least a week of real data to do this properly.
Step 7 — Allow the Data Collection Period
Wait at least one full week before doing business-level validation. Here’s why:
- One week captures weekly traffic patterns (weekday vs. weekend behavior differs significantly)
- Sufficient volume makes anomalies statistically meaningful
- Processing delays of 24–48 hours in GA4 mean same-day data is incomplete
While you wait, monitor for early warning signs:
- (not set) values appearing in key dimensions
- Pageview counts that seem implausibly high or low
- Funnel steps that don’t add up logically
- Events with zero recorded instances that should have fired
Step 8 — Validate Against Business Requirements
Now compare GA4 data against what the business expects:
Conversion Tracking
- Are conversion counts within the expected range?
- Do the conversion rates look reasonable for this type of site?
- Are all revenue values populating correctly?
Reconcile With External Systems
This is the most powerful validation step. GA4 data should roughly align (not match exactly) with:
- CRM data — lead form submissions in GA4 vs. leads in CRM
- Payment processor — purchase events in GA4 vs. transactions in Stripe/PayPal
- Server logs — session counts vs. server-side request logs
| 💡 What ‘Roughly Align’ Means | GA4 is not a transaction ledger. Expect a 5–15% variance between GA4 and backend systems due to ad blockers, cookie consent, and network conditions. Variances over 20% usually indicate a tracking problem worth investigating. |
|
PHASE 4: DATA ANALYSIS AND REPORTING
Week 1+ | Goal: Deep validation and quality analysis |
Step 9 — Create a Looker Studio Validation Report
A Looker Studio dashboard serves two purposes: it makes anomalies visually obvious, and it gives stakeholders a sharable view of tracking health.
Include these sections in your validation report:
- Event counts by event name — spot missing or doubled events instantly
- Conversion funnel — identify where users are unexpectedly dropping out
- Traffic source breakdown — verify UTM parameters are passing correctly
- Device and browser breakdown — catch device-specific tracking issues
Step 10 — Extract and Analyze Data
Go deeper using GA4’s built-in tools:
- Explorations — custom event and parameter analysis
- Funnel explorations — visualize conversion paths and spot gaps
- Path analysis — understand user journeys before and after key events
- BigQuery (if connected) — SQL-level analysis for the highest-confidence validation
Apply filters to validate specific segments:
- By traffic source — does organic traffic track differently than paid?
- By device — do mobile users show lower conversion rates due to a tracking bug?
- By date range — compare Week 1 to Week 2 to check for consistency
Red Flags to Watch For
- Events with zero counts that should have fired
- Dimension values that show as (not set) — indicates a missing data layer push
- Outlier values — a revenue event showing $0 or $999,999
- Duplicate events — the same event name appearing twice per user action
|
PHASE 5: ONGOING MONITORING AND MAINTENANCE
Ongoing | Goal: Maintain long-term data accuracy |
Validation is not a one-time event. Websites change, code gets updated, and tracking breaks in unexpected ways. Ongoing monitoring is what separates teams with reliable data from teams who only discover problems months later.
Step 11 — Monitoring Schedule
- After every website update or feature release — re-validate affected tracking
- Bi-weekly or monthly — review new implementations and spot-check existing events
- Quarterly — run a full tracking audit against the measurement plan
Step 12 — Set Up Automated Monitoring
Use GA4’s built-in alerting to catch issues automatically:
- Traffic drop alert — triggers if sessions drop significantly day-over-day
- Conversion drop alert — triggers if conversion event counts fall below threshold
- Unexpected spike alert — triggers if a single event fires at abnormally high volume (potential duplicate)
Step 13 — Maintain Your Documentation
Outdated documentation is nearly as bad as no documentation. Keep these up to date at all times:
- GTM change log — every published version with a description of what changed
- Event catalog — every tracked event with its name, trigger, and parameters
- Parameter definitions — what each parameter means and where its value comes from
- Custom dimensions registry — every GA4 custom dimension and metric
- Known issues log — current tracking limitations and the workarounds in place
Common Issues and How to Fix Them
Use this section as a reference when something goes wrong. Issues are grouped by category.
Technical Issues
| Issue | How to Fix It |
| Trigger fires too early | Check if the data layer push happens before the trigger. Delay the trigger or listen for the correct data layer event. |
| Variable returns undefined | Verify the data layer variable name matches exactly. Check for timing issues where the variable is read before the data layer is populated. |
| Tag blocked by ad blocker | Expected behavior. Document the variance and account for it in reporting. |
| Consent mode not working | Verify consent mode is configured in GTM. Check that the consent update fires after the user makes a choice. |
| Data layer not populated | Check the order of data layer pushes in the page source. Ensure the GTM snippet loads after the initial data layer definition. |
Data Quality Issues
| Issue | How to Fix It |
| (not set) in dimensions | The custom dimension parameter is not being sent with the event. Check the event tag configuration in GTM. |
| Duplicate events | The trigger is firing multiple times. Check for duplicate GTM triggers or tags. Use trigger exceptions to prevent double-firing. |
| Wrong attribution | UTM parameters not passing correctly. Check landing page URL preservation and session storage behavior. |
| Missing parameters | Parameters configured in GTM but not arriving in GA4. Test in DebugView and check network requests. |
Final Go-Live Validation Checklist
Use this checklist as your sign-off confirmation. Every item should be checked before validation is considered complete.
Technical Validation
| ☐ | GTM container published — confirm version number |
| ☐ | DebugView verified — all key events appear with correct parameters |
| ☐ | Network requests validated — all return 204 status with correct parameters |
| ☐ | Event names match measurement plan exactly (case-sensitive) |
Fix Validation
| ☐ | All identified issues have been resolved |
| ☐ | GTM container updated and new version published |
| ☐ | All previously-failed events now pass full re-validation |
Business Validation
| ☐ | Minimum 1 week of data collected |
| ☐ | Conversion tracking verified and counts are reasonable |
| ☐ | Data reconciled against at least one external system (CRM, payment processor, or server logs) |
| ☐ | Looker Studio validation report created and shared with stakeholders |
Documentation and Sign-Off
| ☐ | All discrepancies documented with explanations |
| ☐ | Known issues and workarounds recorded |
| ☐ | Monitoring schedule established |
| ☐ | GTM change log updated |
| ☐ | Stakeholders informed of validation outcomes |
| ☐ | Analytics lead sign-off obtained |
| ☐ | Marketing team sign-off obtained |
Final Thoughts
Post-launch validation is not a task you complete once and forget. Every website update, every new feature, every GTM change is an opportunity for something to break silently.
The teams with the most reliable analytics data are not the ones who built the most sophisticated tracking implementations. They’re the ones who built a habit of validation — checking their data regularly, maintaining their documentation, and treating data quality as an ongoing responsibility rather than a launch-day checklist.
Use this playbook as your foundation. Adapt it to your business, your team, and your stack. And when something breaks — and it will — you’ll have the tools and the process to find it fast and fix it with confidence.
| 🎯 Remember | Reliable data leads to accurate reporting. Accurate reporting leads to confident decisions. Confident decisions lead to better business outcomes. It all starts with proper post-launch validation. |