How to Set Up and Optimize Google Analytics 4: A Step-by-Step Guide

If you are trying to enhance your online presence, web or app owners need a better insight into visitor handling. This is where Google Analytics 4 (GA4) comes into play. Not familiar with this tool? Think of it as a software that gives you a transparent overview of webpage traffic and interactions. GA4 builds on earlier versions of Universal Analytics and provides better tracking in terms of user behavior, allowing you to understand how people interact with your website or app.
This blog will guide you through GA4 and explain how it works. You’ll discover how to set up your GA4 account, explore its key features like event-based tracking, and learn how to integrate it with platforms such as WordPress and Shopify.
Key Features of GA4
Google Analytics 4 (GA4) is a powerful tool for understanding user interactions across your websites and apps. It offers a modern approach to analytics, focusing on flexibility and detailed insights with its key features:
- Event-based Tracking: GA4 views every user action as an event, which provides businesses with metrics on the registration of users and their usage behavior.

- Cross-Platform Tracking: This feature will help you track users’ actions across multiple devices and platforms to provide viewable interactions for your online business.

- Customized reporting: GA4 can be used for advanced strategic gating and full-funnel funnel analysis. These processes will help you understand each customer’s interests.

- Privacy-Focused Design: Built with modern privacy regulations like GDPR, GA4 ensures that data protection is a top priority.
Creating a Google Analytics 4 Account
In order to push your digital presence, one of the key things you need to do to track user interactions and analyze those thoroughly. The first step is to set up a Google Analytics 4 (GA4) account. It is simple and lets you focus on gaining insights without jumping through hoops. The steps are as follows:
1. Access Google Analytics: First, go to analytics.google.com and sign in with your Google account within the platform.

2. Add Property: Go to the Admin tab and select “Create a Property”, choose GA4, and input basic details like the name of your property, reporting time zone, and currency.


3. Set up Data Streams: Choose the data sources you want to measure, such as website and app.

4. Prepare the Data Stream: Enter your website link and follow the steps to complete the setup process. This is how your data will begin to flow into GA4.

Setting Up GA4 Manually on Your Website or Store
- Go to the ‘Data Streams’ section in your GA4 property.
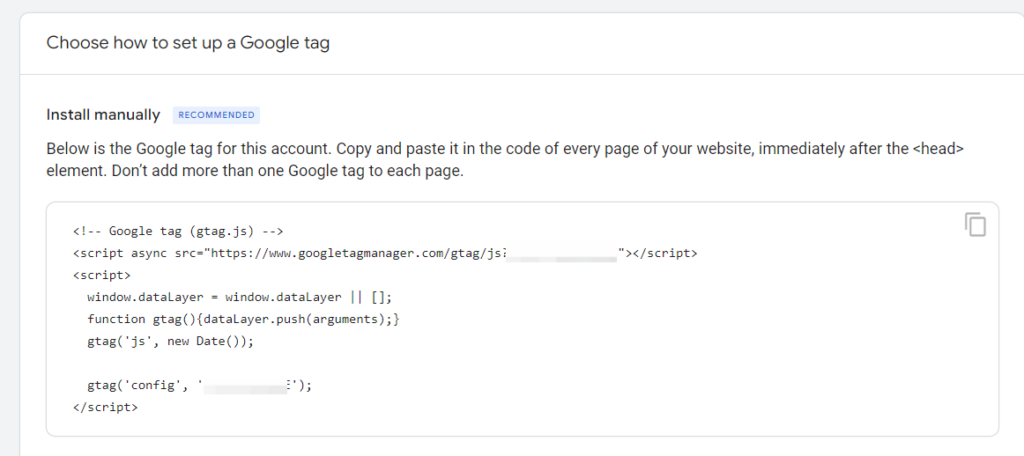
- Choose your web data stream and copy the provided Global Site Tag (gtag.js) code.
- Insert this code into the <head> section of your website’s HTML to activate tracking.
 Verify the Installation:
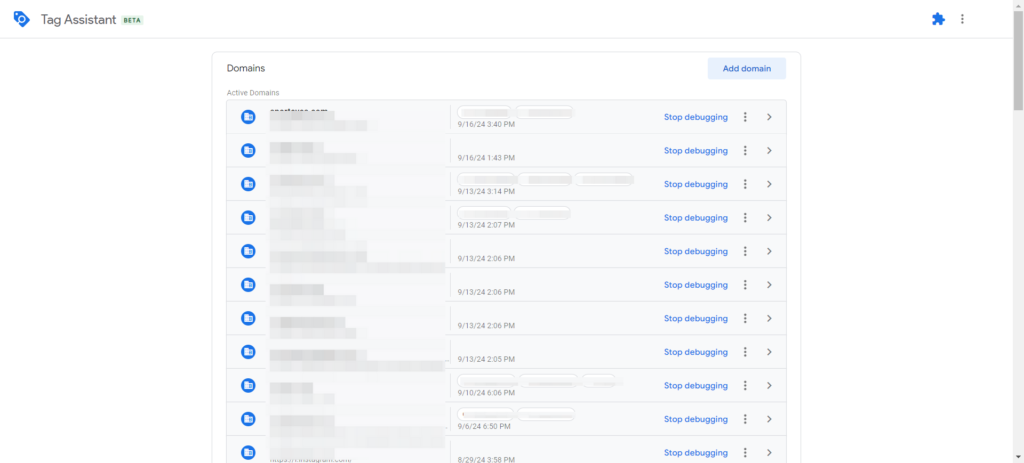
- Use the Tag Assistant Chrome extension to confirm the tag is firing correctly.
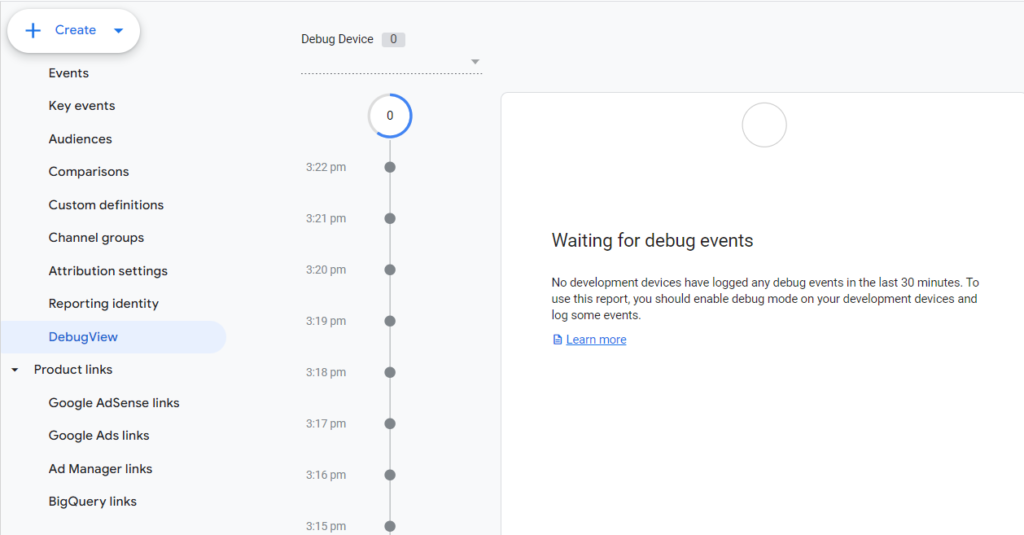
- Alternatively, check the GA4 DebugView to ensure data is being collected accurately.
Setting Up GA4 on WordPress
You can integrate GA4 with your WordPress site either through a plugin or manually. A plugin will be the easiest method, but manual integration will give you more control. Here is how you can get GA4 in your WordPress site using both ways:
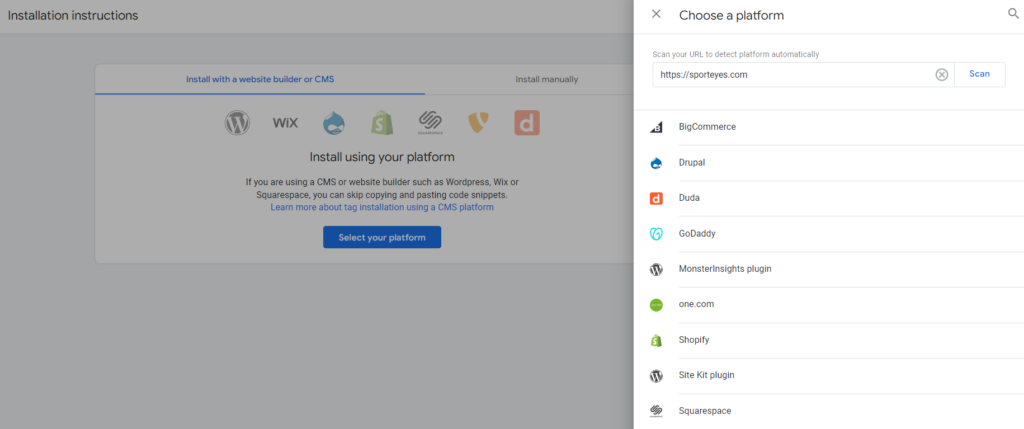
Using a Plugin: This method involves leveraging the Google Site Kit plugin for easy GA4 integration:

- Install and activate the Google Site Kit plugin from the WordPress plugin repository.
- Connect your Google account and select your GA4 property within the plugin.
- Follow the prompts to complete the integration and start tracking.

Manual Integration: If you prefer a more hands-on approach, you can add the GA4 Global Site Tag directly to your theme:
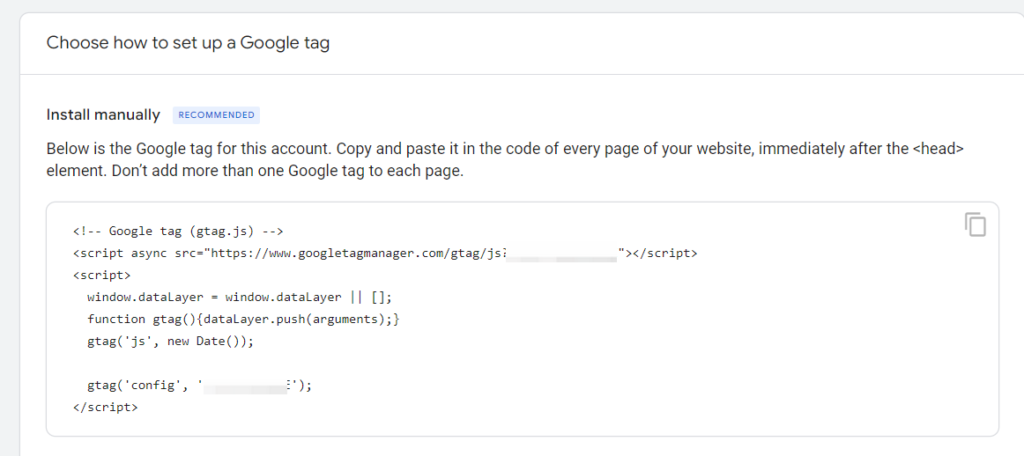
- Locate the header.php file in your WordPress theme.
- Paste the GA4 Global Site Tag code into the <head> section of the file.
- Save the changes to ensure the tracking code is implemented correctly.
Setting Up GA4 on Shopify
Setting up GA4 with your Shopify store will help you track each session with full accuracy. Following these steps, you can easily configure GA4 to track the interactions of users on your Shopify site.
Create a GA4 Property: Begin by setting up your GA4 property if you haven’t already:
- Follow the earlier steps to create a GA4 property and configure your data streams.
- Enable “Enhanced Link Attribution” in the data stream settings. This will help GA4 automatically capture UTM parameters from URLs.
Add the GA4 Tag to Shopify:
Method 1- Manual Installation:
To integrate GA4 with your Shopify store manually, follow these steps:
- Copy the Global Site Tag (gtag.js) from the Data Stream settings in your GA4 property.
- Navigate to your Shopify admin, go to Online Store > Themes > Actions > Edit Code.
- Paste the GA4 tag into the theme.liquid file, just before the </head> tag, and save the changes.
Method 2- Using Shopify’s Built-in Integration:
If the first method fails or you find it too confusing, you can always rely on Shopify’s built-in integration system.
- Add the Google Channel to your Shopify store. Make sure you use a Google account that has access to your GA4 property.
- Select and connect to your GA4 property directly.
- If you wish, you may keep your Universal Analytics (GA3) running alongside GA4.

Connecting Search Console to GA4
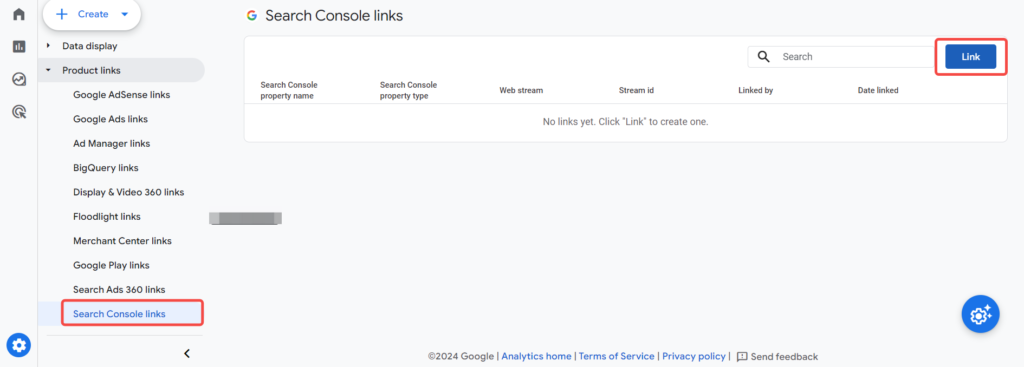
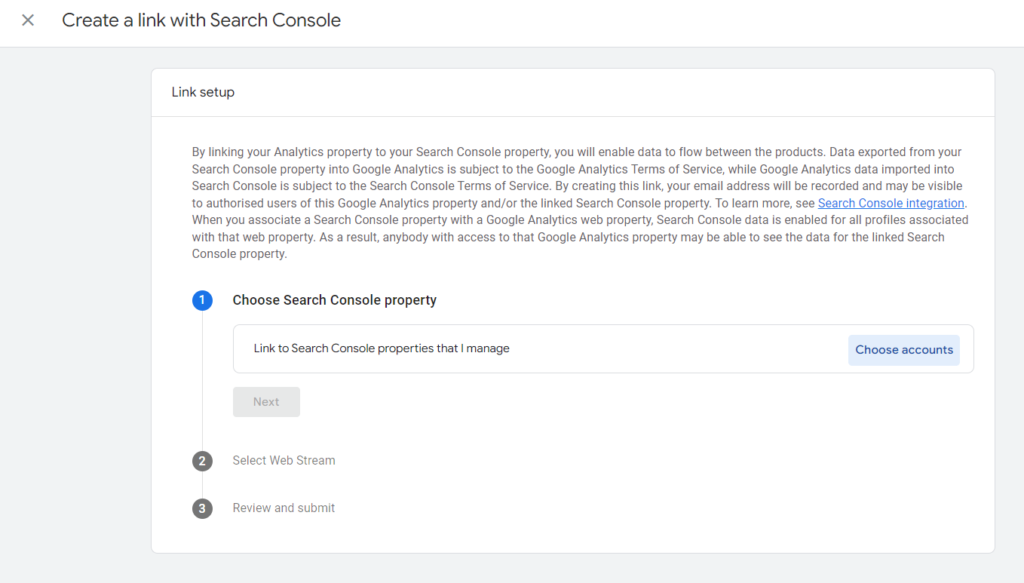
Next, it is important that you integrate Search Console with GA4. This allows you to view and analyze search data directly within GA4. Follow these steps to connect the two platforms:
- In GA4, navigate to the ‘Admin’ section and select ‘Product Links‘ under the Property column.
- Click on ‘Search Console‘ and follow the prompts to link your Search Console property.
- After linking, GA4 will start importing data from the Search Console, which you can view in the Acquisition reports.
Connecting Google Ads to GA4
If you use Google Ads to promote your business, GA4 is going to do wonders for you. Connecting your GA4 profile to Google Ads will help analyze ad performance more effectively.
Here’s how to set up the connection:
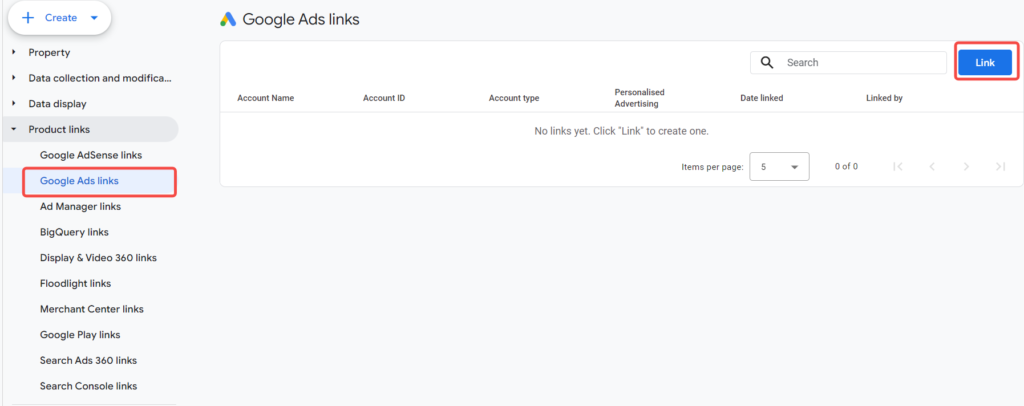
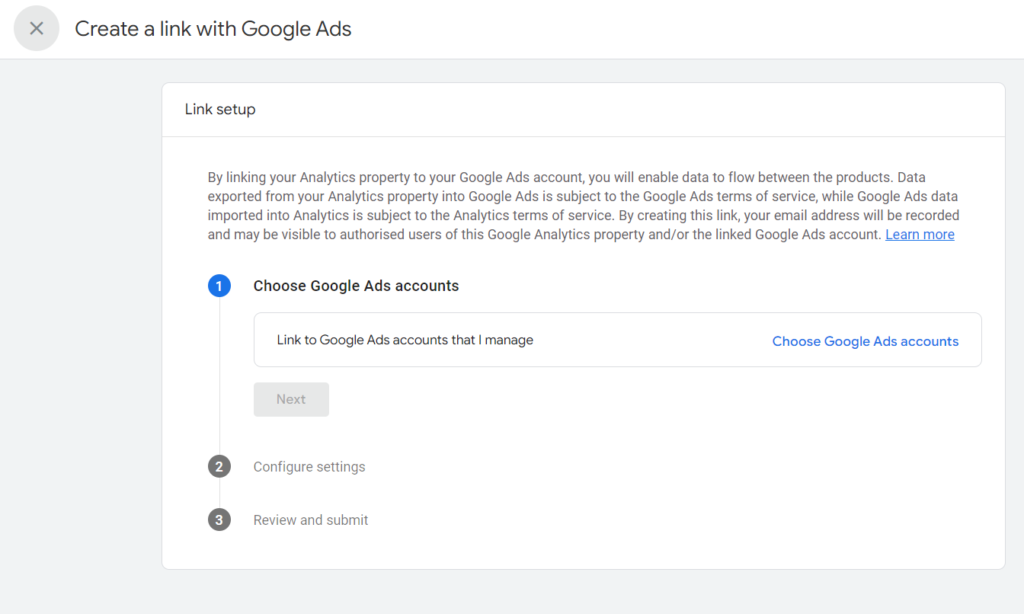
- In GA4, go to the ‘Admin’ section and select ‘Google Ads Linking‘ under the Product Links section.
- Choose your Google Ads account and authorize the link to connect it with GA4.
- Set up conversion tracking to monitor the performance of your ads and see detailed metrics in GA4.

GA4 Interface Overview
The GA4 interface is very easy to navigate and provides a comprehensive view of your data & analytics. It is designed to help you easily view key metrics and reports. Moreover, you can also use the various tools for an in-depth analysis and customization.
Here’s a brief overview of the main sections:
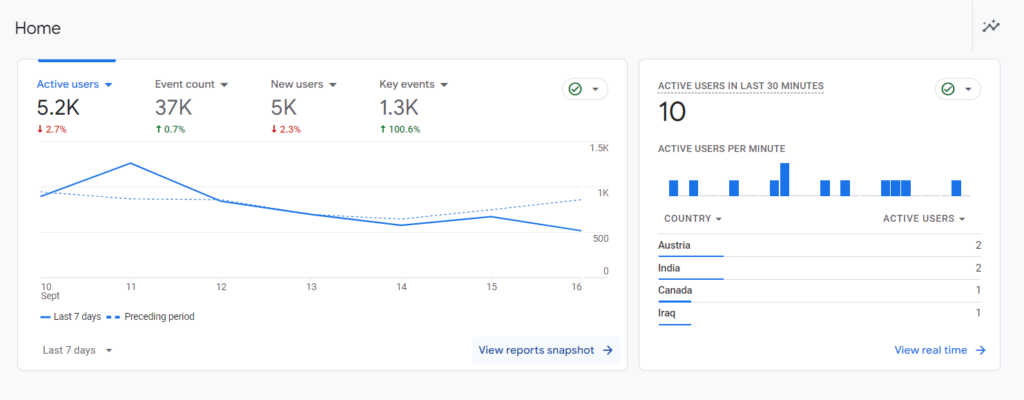
- Home: The Home section summarizes key metrics and insights, giving you a quick snapshot of your site’s performance.
- Reports: This section provides you with access to standard reports such as Acquisition, Engagement, and Monetization. These reports will help you understand user behavior and site performance in detail.

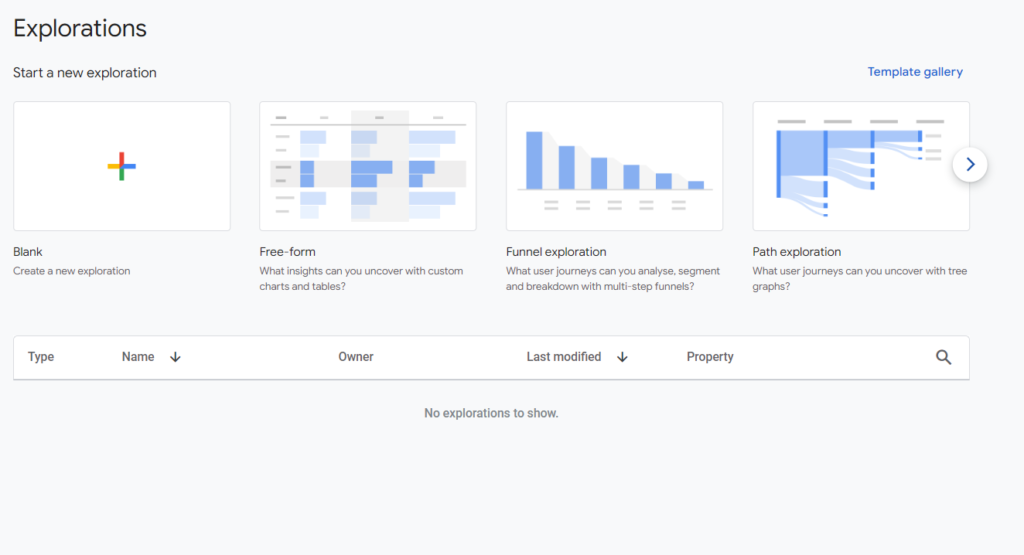
- Explore: You can use the Explore section to create custom reports and delve deeper into specific data sets with the Exploration tools available.
- Advertising: In this section, you can view metrics related to ad effectiveness and return on investment. This will help you analyze the performance of your advertising campaign.

- Configure: This section is where you can set up and manage events, conversions, and audiences to customize GA4 to your tracking needs.
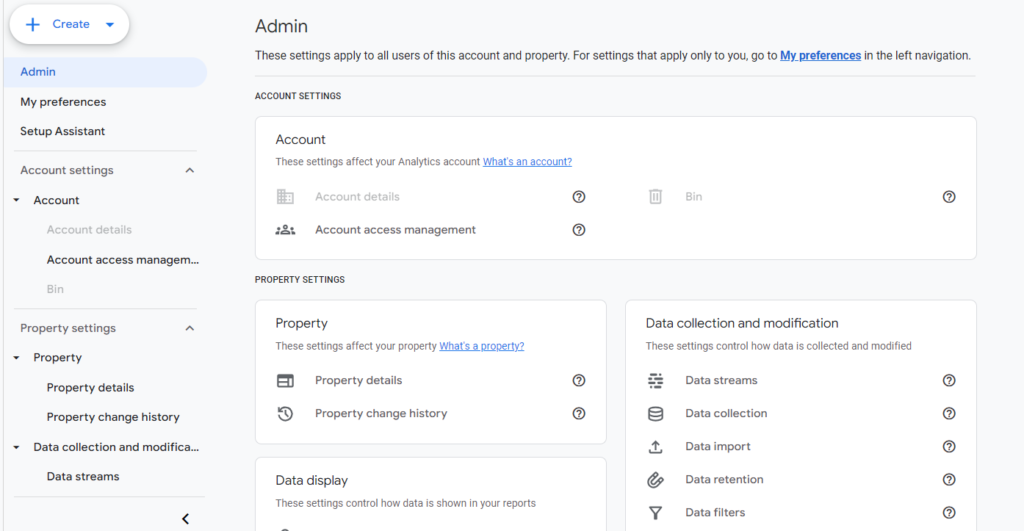
Steps to Configure Consent and Data Settings in GA4
To set up consent and data settings in Google Analytics 4 (GA4), you need to follow a few key steps to ensure data is collected and used according to your preferences. This setup is essential to managing user data handling and staying compliant with privacy regulations. Below is a step-by-step guide that will help you configure these settings easily.
- Navigating to Admin: Open your GA4 property. Then, click the Admin button, which is in the bottom left corner of the screen.
- Accessing Data Streams: Look for the Data Collection and Modification section under the Property Settings. From there, select the option called “Data streams.”
- Selecting a Data Stream: Choose the data stream you want to configure by clicking on it.
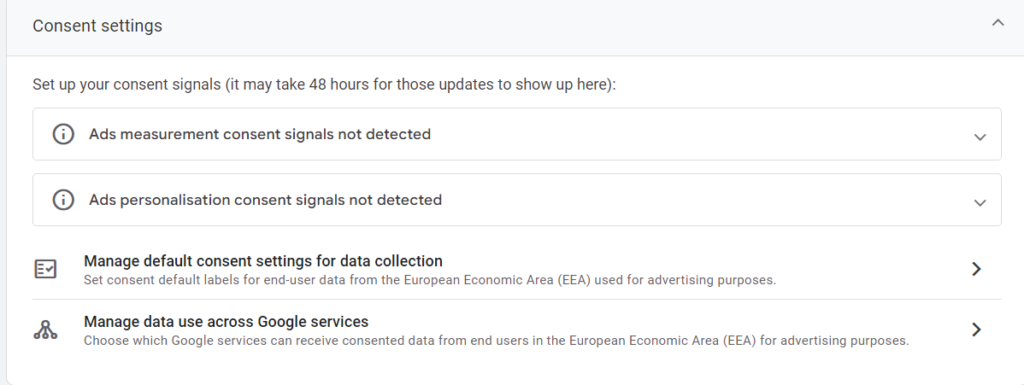
- Configuring Consent Settings: Click the drop-down arrow and pick “Set up consent mode.” Follow the prompts by answering the questions, then click “Next.” Choose your platform and finish the setup by clicking “Done.”
- Managing Default Consent Settings for Data Collection: Pick the default consent option that matches your requirements. Keep in mind only administrators have permission to make these changes.
- Managing Data Use Across Google Services: Data is typically shared with “All Google services.” You can change this setting, but again, administrator access is necessary. The default setting is usually recommended.
- Configuring Enhanced Measurements: Adjust the enhanced measurement settings based on your needs. It is generally advised to turn these off if they may create inaccurate data.
- Configuring Tag Settings under Google Tag
Start by managing automatic event detection alongside enhanced measurement settings.
- Configuring Your Domains: List all domains to allow cross-domain tracking and avoid unwanted outbound click events.
- Allowing User-Provided Data Capabilities: Accept the terms and conditions. Remember, data will be hashed and shared only with enabled accounts. Google will not share this data with other advertisers. Only administrators can make these changes.
- Excluding Internal IP Addresses: Add the internal IP addresses you want to exclude from the data collection process.
- Listing Unwanted Referrers: Identify and list the domains whose traffic you don’t want to count as referrals.
- Adjusting Session Timeout: Set when a session expires after user inactivity (the default is 30 minutes). You can also define when a session should be marked as engaged (default is 10 seconds).
- Overriding Cookie Settings: Customize the cookie expiry and make changes if needed. Again, only administrators can adjust these settings.
- Overriding Consent Mode Defaults: This step applies if your consent banner uses consent mode. It changes the default consent state to ‘denied’ until a user consents. This setting overrides all other default consent settings in Google Tag for specific regions. Only administrators can change this setting.
- Managing Default Consent Settings for Data Collection in the EEA: Ensure personal data collection complies with EU consent policies for users in the European Economic Area (EEA). By default, GA4 does not mark this data as consented unless specified. Only administrators can adjust this setting.
These steps will guide you in properly configuring consent and data settings, ensuring compliance with privacy regulations, and managing how data is collected and used effectively.
Wrapping Up: Unlock the Power of GA4
Google Analytics 4 offers a comprehensive toolkit for understanding user behavior and optimizing digital presence. With features like real-time reports, custom event tracking, and detailed audience insights, GA4 equips you with the tools to make informed decisions and enhance your marketing strategies. Whether you are tracking user journeys, analyzing campaign performance, or setting up detailed funnels, GA4 provides the flexibility and depth needed to gain a clear view of your data.
Ready to take your analytics to the next level? Start exploring GA4 today and unlock valuable insights to drive your success.